
A strong listing begins with what buyers will see first, the photos. Weekend prep can be enough to create a calm, well proportioned look that draws clicks and showings. The aim is simple, set clear sightlines, use neutral art, and get scale right so rooms feel spacious and intentional.
Research consistently points to three priority spaces. The living room, the primary bedroom, and the kitchen drive the most buyer attention in photos and in person. With a few focused changes, these rooms can carry the rest of the tour.
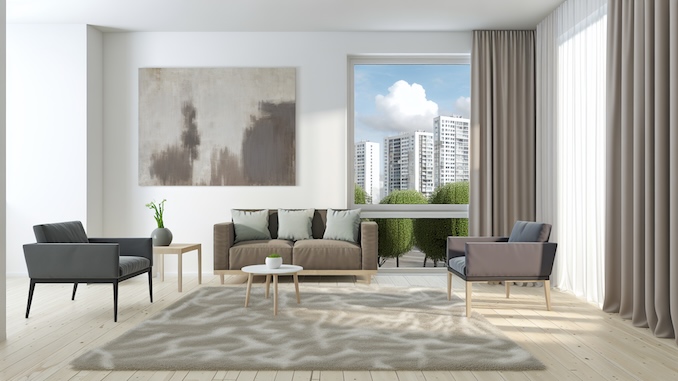
Start With What Buyers See First
Lead With a Clear First Glance
Buyers expect photos that feel polished and easy to visualize. Industry snapshots report many agents see faster offers when rooms are staged for photos, and buyers respond to that clarity.
From the entry, let the eye run to a focal point and then out to a window. For fast, neutral choices suited to Calgary listings, explore Desenio canvas art prints for pieces that fit common sofa widths. Remove extras that break the view so depth reads immediately in frame.
Give the Living Room Top Billing
National data puts the living room at the top of the priority list, followed closely by the primary bedroom and the kitchen. A recent NAR report finds that staging can raise sale prices and shorten time on market, so Calgary listings benefit when this room reads balanced and open.
Edit seating so there is a clean pathway and a single focal wall. Then set lamps to warm colour temperature to brighten the overall image.
Right-size Artwork for Instant Balance
Use artwork that spans 60 to 75 percent of the sofa width for balance. Hang the bottom edge about 8 to 10 inches above the back of the furniture so the composition stays connected.
Low contrast, larger pieces photograph better than many small ones. The right scale also calms the room, which buyers notice even on a phone screen.
Living Room Moves That Photograph Well: Leave 2 to 3 feet of circulation around the primary seating, and place the sofa parallel to the main sightline. Keep accents simple so the lens reads shape and space, not clutter.
If art is needed fast, a large neutral canvas keeps the room calm in photos. With curated options, large canvas art prints make it easy to hit the right scale and palette.
Set a Calm Primary Bedroom: Layer pale bedding and one substantial piece over the headboard to signal rest. This room ranks among the highest priorities, so a tidy, symmetrical setup pays back on screen and in person.
Match the art width to about two thirds of the bed, and keep nightstands light. The goal is a quiet frame that suggests room to breathe.
Let the Kitchen Read Clean and Bright: Clear counters to three essentials, then add warm 2700 to 3000 Kelvin lamps if winter light is flat. Photograph a front-facing shot, then a 45 degree view from kitchen to dining to show flow. For more on why these moves matter, see the NAR 2025 Profile of Home Staging.
Choose Palettes That Flatter Calgary Light: Warm gray, soft taupe, and muted blue tend to photograph well in prairie light. These tones support many finishes, which reduces style friction for a broader audience.
Avoid busy colour blocks that can moiré on camera. Subtle texture gives depth without distraction.
Pick One Statement Piece When Space Is Tight: Condos and bungalows often feel larger with one correctly scaled artwork rather than a gallery. The single piece anchors the wall and keeps the eye steady.
Pair it with restrained accessories. A simple throw and one table lamp are usually enough.
Hang It Once, Then Move On: Center the piece, test the view from the doorway, and adjust to keep the bottom edge 8 to 10 inches above furniture. This small spacing rule makes the vignette look intentional.
Take a quick phone shot to confirm balance. If the art feels too small, the camera will show it.
Frame at Entry Height to Show Depth: Hold the camera near eye level at the doorway. This height reveals floor lines and reduces distortion, which helps rooms feel larger.
Step back enough to include two walls and the floor. That triangular composition adds instant depth.
Use Two Reliable Angles: Capture one straight-on living room image that centers the focal wall. Follow with a 45 degree kitchen to dining view that shows flow and counter run.
If a hallway connects spaces, aim to show it as a gentle lead rather than a tunnel. A slight angle softens the line.
Let Windows Breathe, Then Highlight the View: Pull curtains wide and leave a few inches of wall showing beyond the frame. This trick helps windows feel bigger.
If there is a Bow River or downtown glimpse, orient seating and artwork so the eye travels to it. The view becomes the story in the photo.
Set a Realistic Band for Quick Wins: Most quick stage-ups land in the two to five thousand dollar range. Recent reporting shows typical spends around four thousand three hundred dollars can align with faster sales and strong sale to list outcomes.
Some samples even report single digit days on market and sale to list near one hundred nine percent. Modest spend, focused well, can pay back.
Spend Where Photos Pay Back: Allocate to one right-sized sofa, one large neutral artwork, and lighting that lifts shadows. These pieces change scale, mood, and sightlines at once.
Skip bulky sets that fill corners. Negative space sells square footage in pictures.
Expect Faster Interest When Basics Match: Aggregated reviews note shorter market times and higher online engagement for staged listings. Some roundups cite up to seventy three percent less time on market and notable price lifts.
The common thread is clear photographs that help buyers visualize life in the space. Neutral art and scale do the heavy lifting.
Essentials to Pick Up Today: Aim for a large neutral canvas, two soft throws, and two lamps in warm white. These few items reset tone and light quickly.
Choose finishes that echo existing wood and tile. Harmony reads as quality.
Sequence the Install in an Hour: Declutter, place the sofa, then hang art using the 60 to 75 percent rule. Add lamps, throws, and a single coffee table vignette.
Photograph after each step. Adjust until the frame feels calm and balanced.
Do a Quick Photo Test and Adjust: Stand at the entry and take two angles. If the room looks narrow, widen the path and pull accessories.
Check brightness and colour cast. Small tweaks often unlock the best shot.
By Sunday, Let the Photos Do the Talking
A weekend of focused edits can reshape how a listing performs online. Prioritize the living room, the primary bedroom, and the kitchen, set neutral art to the right scale, and keep sightlines clear so buyers instantly understand the space. With these moves in place, the photos lead the way to faster interest.